BLOGGER TEMPLATES AND TWITTER BACKGROUNDS

Monday, August 15, 2011

Severed Finger Keychain


If you read the last blog post about making severed finger invitations, you might be excited for this post as well!

I recently started making severed finger key chains! So if you are interested in purchasing one, shoot on over to my ETSY website and order yourself one!

http://www.etsy.com/listing/79802441/severed-finger-keychain?ref=pr_shop

Sunday, August 14, 2011

Severed Finger Invitation


Okay, Okay. I may have saved the best for last, but check out this severed finger invitation idea. Believe it or not, this idea came from MarthaStewart.com!


This invitation is sure to make your party guests come crawling to your party!

You are going to need: Mold rubber
Paper cup
Quick-drying plaster
India ink
Water
Natural Sponge
Paper
Small cardboard box
Reindeer moss
Silk embroidery ribbon

And if you are wondering, all of these items can be found at a craft store.


Step 1
Making the Mold


Insert your finger. Remove finger when the mold rubber dries (about 2 minutes).

Step 2
Making the Plaster Finger

Pour quick-dry casting plaster into the mold, and allow to set overnight. Carefully remove the dried-plaster finger: This may require cutting the mold; otherwise, each mold will usually allow one or two more fingers to be cast before a new mold is required.

Step 3
Finishing Details

To make your invitations truly cadaverous, mix India ink and water (1/2 teaspoon ink to 1 cup water), and dab the mixture onto the fingers using a natural sponge. Photocopy the invitation, cut out, and glue to the inside lid of a small cardboard box. Place reindeer moss in the base of the box; using silk embroidery ribbon, tie a "ribbon reminder" around the finger, and place inside the box


Read more at Marthastewart.com: Severed Finger Invitation - Martha Stewart Crafts

Friday, August 12, 2011

Halloween Party Invitations to DIE for

I'm finally back from my short hiatus, my birthday and vacation took more out of me than expected. Nonetheless, i'm back and ready to write! Yesterday I made a trip to Michael's the craft store for some beads to make jewelry. I was pleasantly surprised when I saw they were starting to put out fall and HALLOWEEN decorations. As you all know this is my favorite time of the year and I was a giddy little school girl, as I was looking through all the decorations.

I came across a small box in the shape of a coffin. I immediately picked it up for $2.99 I could make it look exactly how I wanted it to. I then picked up some black and red paints to paint the sucker with and was happy as could be. I stepped over into another isle and came across a string of small skeletons and realized, they were the perfect size to put inside the coffin. My own invitations were born! I couldn't wait to get home and start my creation.

Here is the finished product!


I plan on including a rolled up toe tag that actually has the date and details about the party. Like this


The cute little vial full of glitter probably won't fit into my coffin, so I'll just include the toe tag attached to the foot of my skeleton. Creating the invitations is all about creativity and coming up with ideas YOU like. Make it your OWN.


Interested in more spooky invitations for your Halloween party? I'll have a new post tomorrow with some more ideas!

Feed Squirrel Varified

Tuesday, July 26, 2011

Dexter Themed Party for Halloween!

Josh and I just purchased a house and CAN'T wait to start throwing parties. Halloween is my favorite time of the year, obviously! So we instantly knew we were going to throw a great Halloween party. We both decided Dexter would be a great theme, so I'm going to show all of you some fantastic Dexter themed ideas to have at your own party!


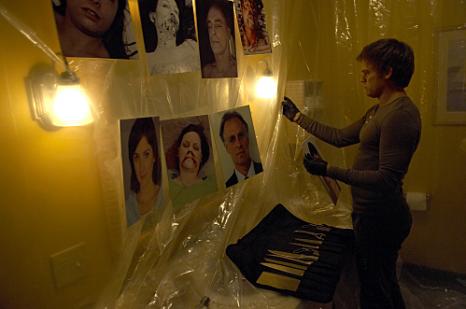
Probably the easiest and most obvious decoration is the plastic wrap Dexter lines all of his kill rooms with. You can use conventional plastic wrap, however you'd need far too many rolls and it would be a pain to put all over your room. I'm going to be using plastic sheeting from Home Depot. This runs $20.97, and depending on the size of your room you may need to buy more than one box.

I plan on setting up a large table in the center of the room which will hold a victim and place settings for my guests. I'll be inviting a large group of people so not everyone is going to get a seat at my victim table however, it's mainly about the presentation.

The best and cheapest way to get a victim for your table, instead of asking one of your friends to sit in plastic wrap all night, is to buy a blow up doll. Spencers has a large variety of blow up dolls for $19.99. This time you can use your household plastic wrap and wrap the doll in it. Get some fake blood and make the cut along the check Dexter always does for his slide collection.

Speaking of his blood slides. We are going to make some of those as well.

BLOOD SLIDES.
INGREDIENTS:1 cup sugar
1/3 cup light corn syrup
2 Tbs water
red food dye
bamboo skewer or tooth pic
tweezers to serve the slides

INSTRUCTIONS:
1. Line a few baking sheets with Silpat nonstick baking mats or parchment paper.
2. Bring sugar, corn syrup, and 2 Tbs water to a boil in a small saucepan, stirring until sugar is dissolved. Don’t stir, but occasionally wash down sides of pan with a pastry brush dipped in cold water to prevent crystals from forming; boil until mixture turns golden, 5 to 7 minutes.
3. Pour the melted sugar mixture in a line down the center of the pan. Using a skewer or the flat edge of a large knife, spread sugar into a thin flat sheet. Glass slides are pretty thin, so the thinner the better. It will also be easier to cut in the next steps.
4. Once you have the mixture spread into a flat sheet, let it cool and harden for 5-10 minutes. Once the mixture is hard, pull it away from the mat or parchment. If its super thin, try not to crack it.
5. Place the blade of a large knife (not necessarily your best) directly into your burner to heat. If you have an electric stove, you can use a lighter. Once the blade is hot, begin to cut your sheets of sugar into strips. Cut edges to be the length of a real slide. Its good to have a glass slide to use as a template.

This step can be a bit annoying. Don’t worry if you break a few, it happens. Reheat the blade for each cut. Between each cut, wash your blade off with water to keep the sugar from burning to your blade. I don’t suggest using your best knife, since this heating and cooling isn’t the best treatment for your chef’s blade. If the edges are really rough, dip your finger and water and smooth them out.

6. Lay your cut slides on your baking tray and refrigerate for at least 15 minutes.
7. Take slides out of fridge. Using a tooth pic or a bamboo skewer, paint on the blood circle in the center. You don’t need too much. A small droplet off the tip of your tooth pic will be enough. If you put too much on, it will run all over the slide and make a huge mess. Refridgerate again until the dye is dry and you’re done!


Dexter always has pictures of the killers victims strung out for them to see before they die. Easiest thing to do is buy a rope and some clothes pins. Print of some black and white pictures of strangers or even your guests.
String the rope from one side of the room to the other. Pin them to the rope. It's that simple.


Another simple touch that will make your guests go wild, is to get some old barbie dolls and dismember them. I know, I know. But we are channeling the ice road trucker here. Wrap little red ribbons around the dismembered parts and scatter them throughout the room.


If there aren't going to be children present at your party, you can always lay knifes on the victim table as well.

Lastly, buy some fake blood (by the gallon) at a Halloween store and just drip the fake blood all of the victim the walls etc. Making sure you aren't putting fake blood where people will be walking or sitting, because if the blood doesn't dry you'll have it all over clothing and your house!


I hope you enjoy decorating your house for Halloween as much as I do!

Friday, July 22, 2011

Spooky Recipes that will make your Halloween party a hit!

Every Halloween I try to find recipes for spooky dishes that I haven't seen before. I can't guarantee you've never seen these dishes before, BUT I can guarantee it'll keep your guests coming back for more.


Want a great dip for your candy apples or other types of spooky fruits you will be serving?

I present to you (edible) Ashtray dip. I know, I know. The look alone may turn you off, but come on. I'm all about freaking my guests out, and this recipe is sure to do it!

INGREDIENTS: 1/3 cup oreo cookie crumbs
1/3 cup powdered sugar
Candy Cigarettes
1 large NEVER USED ashtray

INSTRUCTIONS: 1. First, please clean out the ashtray with soap and water.
2. Next, you want to put the Oreo cookies into a food processor. You want to insure the cookies are a very fine dust!
3. Place the cookie crumbs at the bottom of your clean, dry ashtray.
4. Sift the powered sugar over the crumbs. Mix gently until the mixture resembles an ashtray.
5. Put you candy cigarettes into the mixture and enjoy!


Stuffed Roaches will add the perfect touch to your table, and creep the hell out of your guests. This recipe is so simple.

INGREDIENTS: 1/3 cup cream cheese, softened
1/4 cup walnuts, chopped semi-fine
20-30 dates, pitted

INSTRUCTIONS: 1. Combine the cream cheese and walnuts until mixed well.
2. Gently fill each date with the cream cheese and nut mixture.
3. Serve on a festive tray. Make sure you put some rubber roaches onto the platter as well. Label the dish as "Stuffed Roaches" or even "Fresh caught Roaches".


Slimy Worms Recipe This finger food is sure to taste good and be a hit with your guests. So cute. SO gross.


*Just a little note before we get started with the recipe, it is VERY important that you use a tall slim container to hold the straws. They have to be tight in the container or the gelatin will run back out before it can set. You can use a half gallon milk carton with the top cut off, or even the Tupperware containers used to hold cereal.


INGREDIENTS:
1 pkg. (6 oz) purple gelatin (raspberry or grape work well)
3/4 oz. unflavored gelatin
3 C. boiling water
3/4 C. whipping cream
green food coloring, as needed
100 plastic straws


INSTRUCTIONS: 1. In a medium, heat safe mixing bowl, stir together plain and flavored gelatin powders.
2. Pour boiling water over, stirring until gelatin is fully dissolved.
3. Allow gelatin to cool til only slightly warm.
4. Stir whipping cream into the gelatin mixture. Stir in green food coloring (you'll probably need 10 drops or more) until your gelatin gets that purpley-brown-grey color of earthworms.
5. With your 100 straws fully extended and snug in your chosen container, pour the gelatin mixture over the straws, filling the container.
6. Cover container and chill at least 8 hours. You can make them and store them this way up to two days in advance of your Halloween party.
7. Remove straws from their container (cutting or ripping a disposable container away is easiest).
8. With hot tap water running, place batches of 4-5 straws under hot running water for a couple quick seconds.
9. Remove "worms" from their straw casings, pressing with fingers. Set on waxed paper to set up.
10. Repeat until all worms are removed.
12. Chill, covered, on waxed paper at least 2 hours.
13. Serve in a chilled bowl, as pictured. Then watch all the kids gobble up this fun Halloween party food.


I hope you enjoyed the above recipes and get to use them this Halloween. I know I will.

I got all my recipes from http://www.divinedinnerparty.com/disgusting-halloween-food.html be sure to check them out!

Thursday, July 21, 2011

West Virginia Penitentiary

If you live in West Virginia or anywhere close you've heard of the former West Virginia Penitentiary. Hell if you watch the travel channel you've probably heard of it. The "Penn" as most people call it, is located in Moundsville, West Virginia. My hometown!

The West Virginia Penitentiary was built in 1866, but after serving the state for 129 years, it was closed in 1995. Don't get too mad though, the "Penn" is still open to the public for tours, ghost tours, haunted house (around Halloween), and many other special events.

The West Virginia Penitentiary housed all the criminals you'd never want to meet. The facility was even ranked by the United States Department of Justice's Top Ten Most Violent Correctional Facilities List.


Stabbings, hangings, riots, prison breaks, and executions were something that was always going on in the prison. So one can only imagine, with all that hate and anger in one building, something evil must still be lurking in the walls of the West Virginia State Penitentiary.

Many paranormal teams have come to investigate the "hauntings" that have said to have taken place here.


You can visit the "Penn" website here http://www.wvpentours.com/ . Where you can find out all the information you need to know!

I know from personal experiences, the place is spooky. I've never spent enough time in there alone to hear or see any strange things, however, I believe something strange is still going on in there.

Want to investigate the prison at night and really see what its made of?

" Tour the facility with a guide for about ninety (90) minutes, and then roam the halls on your own. See who you can “find” living in the Sugar Shack or the Alamo, look for patients in the psych ward, visit with Shadow Man - if he is home, or try to sleep in a cell – we dare you! Bring a friend, bring 30 friends or come by yourself on Saturday nights! 7 hours (11:00pm – 6:00am) $60 per person Up to 60 people only OPEN TO THE PUBLIC"

You can visit this link http://www.wvpentours.com/page/ecocat.detail/enav/20/Ghost-Adventures-2011.html to purchase your ticket for the Ghost Adventures 2011.

If you too scared to visit the prison at dark, the facility offers day tours. Tuesday-Sunday 11am-4pm. Ticket prices are $10 for adults, $8.00 for seniors, Children 6-16 $6.00, and Children ages 5 and under are free.


ALL the information I've given to you came from. Wvpentours.com So if you have any other questions or inquires visit their website.

I leave you with this. A visitors tale. (Taken right from http://www.wvpentours.com/ )

"I felt almost as if someone was caressing my hand. I didn't pay much mind. My aunt and I then joined a man and woman who go to these things regularly and walked about with them. We first sat down in the cafeteria and and turned off all the lights and the man and woman sat across the room from my aunt and I. As we were sitting there I felt as if someone was there and was just putting pressure in the middle of my back........" Finish reading the story here!


Wednesday, July 20, 2011

Welcome to Boneyard Gazette.

Hello all and welcome to my new blog "Boneyard Gazette". I want to start off by saying I hope you enjoy Halloween and all spooky things as much as I do.

Now you get to learn a little bit about me. My name is Courtney and I'm 22. From a small age I've always been fascinated with things that go bump in the night, ghosts, goblins, Halloween, and all unexplained things. I count down the days to Halloween every year! I've had a passion for writing from a young age and have had many blogs in my life. However none of them were truly my passion. I think I've got it right this time.

You can expect to see from my blog, daily posts...hopefully ;)...upcoming Halloween conventions, recipes for great Halloween geared food, costume ideas, decorating tips, ghost stories, featured individuals with as much love for Halloween as me, and anything else that is scary! Halloween may only come around once a year, but the fun shouldn't stop there. As soon as Halloween is over, planning for next Halloween begins. It's a year round process. ;)

I've got high hopes for this blog and want to get right down to business. Join me if you want. It's going to be a great ride!